In this article, the weld defect acceptance/rejection criteria are given for the following tests/NDT;
1. Acceptance criteria for Visual Inspection
2. Acceptance criteria for Radiography Test (RT)
3. Acceptance criteria for Ultrasonic Test (UT)
4. Acceptance criteria for Liquid Penetrant Test (LPT/LPI/DPT)
5. Acceptance criteria for Magnetic Particle Test (MPI/MPT/MT)
(This article covers the weld defect acceptance criteria as per ASME Section VIII Div 1, which is one of the most widely used standards for acceptance criteria for weld defects)
Acceptance criteria for Visual Inspection
(Refer: UIG-97, Page – 345 of ASME BPVC Section VIII Div 1, 2017 Edition.)
(a) The surface shall be free of any visible laminations, spalling, or cracks. Cracks in tubes shall not be repaired and shall be considered cause for rejection.
(b) For tubes, the depth of scratch shall not exceed 1/32 in. (0.8 mm). For all other material, the scratch depth shall not exceed 1/8 in. (3 mm).
For an acceptable limit of thickness reduction, Refer to UW-35 (sub-para b, page – 144) which states that:
- The reduction in thickness shall not exceed 1mm (1/32 in.) or 10% of material nominal thickness whichever is less, provided that the material of the adjoining surfaces below the design thickness at any point.
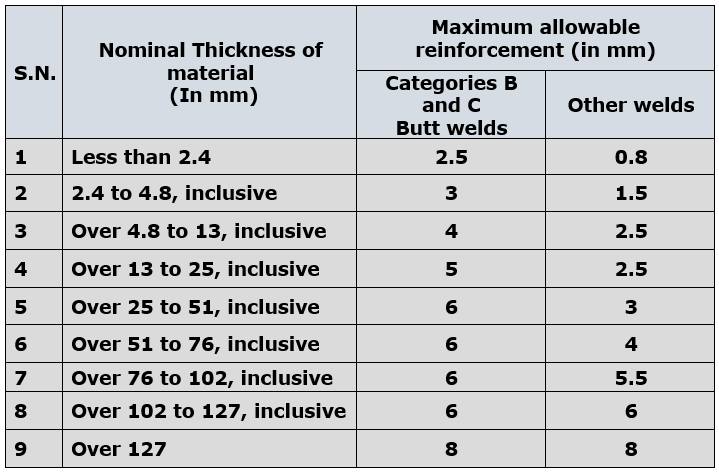
For the allowable limit of Weld Reinforcement (excess weld metal), Refer to UW-35 (sub-para d, Page – 144)

*************************
Acceptance criteria for Radiography Test (RT)
(Refer: UW-51: Sub Para b (Page 148 and 149) and Mandatory Appendix 4 (Page 400 and Page 403) of ASME BPVC Section VIII Div 1, 2017 Edition.)
Following terminologies have been used to explain the acceptance/rejection criteria for Radiography Test (RT);
Linear Indication: Any indication with a length greater than three times the width. Linear indications are mainly cracks, lack of penetration, lack of fusion, and elongated slag inclusions.
Rounded Indication: Any indication with a length equal to or less than three times the width. A rounded indication may be circular, elliptical, conical, or irregular in shape and may have tails too. While determining the size of an indication, the tail shall also be included. Rounded indications may appear on radiographs from any imperfection in the weld, such as porosity, slag, or tungsten.
Acceptance criteria for Linear Indication (UW – 51):
1. Any crack, lack of penetration, and lack of fusion shall not be accepted
2. Any other elongated indication shall be considered unacceptable, which has a length greater than;
- 6 mm (1/4 in.) for T up to 19 mm (3/4 in.)
- T/3 for T greater than or equal to 19 mm (3/4 in.) and less than or equal to 57 mm (2-1/4 in.) i.e. 19 mm ≤ T ≤ 57 mm.
- 19 mm (3/4 in.) for T greater than 57 mm (2-1/4 in.)
(Where, ‘T’ – Thickness of the weld metal excluding any allowable reinforcement).
3. Any group of indications (inline) with an aggregate length of more than T (within a length of 12T) shall be considered unacceptable except when the distance between the successive discontinuities exceeds 6L.
(where ‘L’ is the length of the longest imperfection in the group).
Acceptance criteria for Rounded Indication (Mandatory Appendix 4):
According to this appendix, those rounded indications which exceed the following dimensions shall be considered relevant.
- T/10 for T less than 3 mm (1/8 in.)
- 0.5 mm (1/64 in.) for T from 3 mm to 6 mm (1/8 in. to 1/4 in.), inclusive
- 1.0 mm (1/32 in.) for t greater than 6 mm to 50 mm (1/4 in. to 2 in.), inclusive
- 1.5 mm (1/16 in.) for T greater than 50 mm (2 in.)
Apart from the above conditions, Mandatory Appendix 4 also contains some tables, charts, and figures as a reference for acceptance/rejection criteria.
Please watch the video (given below) for more clarity on acceptance criteria for the Radiography test (RT);
*************************
Acceptance criteria for Ultrasonic Test (UT)
(Refer: Mandatory Appendix 12 (Page 435) of ASME BPVC Section VIII Div 1, 2017 Edition.)
(a) Indications characterized as cracks, lack of fusion, or incomplete penetration are unacceptable regardless of length.
(b) Other imperfections are unacceptable if the indications exceed the reference level amplitude and have lengths that exceed:
- 6 mm (1/4 in.) for T up to 19 mm (3/4 in.)
- T/3 for T from 19 mm to 57 mm (3/4 in. to 21/4 in.)
- 19 mm (3/4 in.) for T over 57 mm (21/4 in.)
where T is the thickness of the weld excluding any allowable reinforcement. For a butt weld joining two members having different thicknesses at the weld, T is the thinner of these two thicknesses. If a full penetration weld includes a fillet weld, the thickness of the throat of the fillet shall be included in T.
Please watch the video (given below) for more clarity on acceptance criteria for the Ultrasonic test (UT);
*************************
Acceptance criteria for Liquid Penetrant Test
(Refer: Mandatory Appendix 8 (Page 417) of ASME BPVC Section VIII Div 1, 2017 Edition.)
The following terminologies have been used to explain the acceptance/rejection criteria for Liquid Penetrant Examination (PT).
Relevant Indications: Indications with major dimensions greater than 1.5 mm (1/16 in.) shall be considered relevant.
Linear Indication: Any indication with a length greater than three times the width.
Rounded Indication: Any indication with a length equal to or less than three times the width. A rounded indication may be of circular or elliptical shape.
Acceptance Criteria for Liquid Penetrant Examination (Mandatory Appendix 8):
All surfaces to be examined shall be free of:
(a) Relevant linear indications shall be rejected.
(b) Relevant rounded indications greater than 5 mm (3/16 in.) shall be rejected.
(c) Four or more relevant rounded indications in a line separated by 1.5 mm (1/16 in.) or less (edge to edge).
*************************
Acceptance criteria for Magnetic Particle Test (MT)
(Refer Mandatory Appendix 6 (Page 412) of ASME BPVC Section VIII Div 1, 2017 Edition. Acceptance criteria are the same as that of Liquid Penetrant Examination)
The following terminologies have been used to explain the acceptance/rejection criteria for Magnetic Particle Test (PT).
Relevant Indications: Indications with major dimensions greater than 1.5 mm (1/16 in.) shall be considered relevant.
Linear Indication: Any indication with a length greater than three times the width.
Rounded Indication: Any indication with a length equal to or less than three times the width. A rounded indication may be of circular or elliptical shape.
Acceptance Criteria for Magnetic Particle Examination (Mandatory Appendix 6):
All surfaces to be examined shall be free of:
(a) Relevant linear indications shall be rejected.
(b) Relevant rounded indications greater than 5 mm (3/16 in.) shall be rejected.
(c) Four or more relevant rounded indications in a line separated by 1.5 mm (1/16 in.) or less (edge to edge).
Please watch the video (given below) for more clarity on acceptance criteria for Liquid Penetrant Test (LPT/DPT) and Magnetic Particle Test (MPT);
To learn about the different types of welding defects, causes, and their remedies, Please click here


thanks for having all acceptance criteria in single page.. what i was looming for
Dear sir, Please give a download option for video & PDF
Fantastic way to improve knowledge.
Thank you
Wow! I am just about to start my welding career and this insight is quite useful. Thanks
Amazing article worth reading.Best for those looking to enhance their skills.
I love this site because i just learn alot
thanks for having all acceptance criteria on a single page.. what I was looming for
sir,can u give informations about API 570 Pipeline inspection
Hi Sir. I am very confused regarding acceptance criteria.
1. lets imagine if we have a simple piece welded (which is not part of piping or pressure vessel) which acceptance criteria shall we use?
2. What is the main difference between ASME B31.3 and ASME BPVC SECTION VIII DIV 1?
Hello Gaurav, can you please answer this question for me, according to ASME Section VIII Div 1 acceptance criteria, If an penetrant bleed out measures 1/16″ x 3/16″ what is the disposition of the indication…?? am I correct to say it is linear, relevant, and unacceptable…?? And also if the same indication was present as per ASME B31.1 would the disposition also be , linear, relevant and unacceptable…?? Thank-You for your feedback..
I just had to put a comment here to warn everyone that UIG-97 refers to ONLY to vessels constructed of impregnated graphite, it has NOTHING to do with welding! For welding rules, part UW is applicable